> ## Documentation Index
> Fetch the complete documentation index at: https://www.marqeta.com/docs/llms.txt
> Use this file to discover all available pages before exploring further.
# Core API Quick Start
> Use this Quick Start to start learning how the Marqeta platform works by simulating transactions in your sandbox.
export const EndpointCard = ({method = "API", title, children, href, arrow = true}) => {
const METHOD_STYLES = {
GET: {
bg: "mint-bg-green-400/20 dark:mint-bg-green-400/20",
text: "mint-text-green-700 dark:mint-text-green-400",
border: "mint-border-green-300 dark:mint-border-green-700"
},
POST: {
bg: "mint-bg-blue-400/20 dark:mint-bg-blue-400/20",
text: "mint-text-blue-700 dark:mint-text-blue-400"
},
PUT: {
bg: "mint-bg-yellow-400/20 dark:mint-bg-yellow-400/20",
text: "mint-text-yellow-700 dark:mint-text-yellow-400"
},
PATCH: {
bg: "mint-bg-orange-400/20 dark:mint-bg-orange-400/20",
text: "mint-text-orange-700 dark:mint-text-orange-400"
},
DELETE: {
bg: "mint-bg-red-400/20 dark:mint-bg-red-400/20",
text: "mint-text-red-700 dark:mint-text-red-400"
},
API: {
bg: "mint-bg-black",
text: "mint-text-white"
}
};
const MethodBadge = ({method}) => {
const style = METHOD_STYLES[method?.toUpperCase()] ?? METHOD_STYLES.GET;
return
{method?.toUpperCase()}
;
};
const content =
{}
{}
{title}
{children &&
{children}
}
Step 1 — Create assets
Create an account
Click the sign-up link to create an account on the Marqeta platform: [https://auth.marqeta.com/create-account](https://auth.marqeta.com/create-account)
As part of creating your account on Marqeta.com, you will also create a sandbox and a user.
Create a sandbox
After you have created your account and signed in again, you are ready to create the sandbox where you can simulate transactions on the Marqeta platform.
Click **Create sandbox**. You will receive an email when your sandbox is ready.
The sandbox creation page refreshes to display your [Dashboard](https://app.marqeta.com/development). Your personal API keys and a cURL to try out the sandbox are provided here.
Create a user
The JSON-formatted code sample below creates a simple user by omitting most request fields. See the [Users](/core-api/users/) API reference page for more about the `/users` endpoint.
Save the user token returned in the response, since you will need it to create a card.
```json JSON lines wrap theme={null}
{
"first_name": "Marqeta",
"last_name": "User"
}
```
**Tip**
If you prefer, you can use the [cURL equivalent](/developer-guides/core-api-quick-start/#_create_a_user_2) from the [Sample cURLs](/developer-guides/core-api-quick-start/#_sample_curls) section instead of sending your request in the widget below.
Copy the preceding code.
Click the **POST /users** widget below.
In the widget, click the **Send request** tab.
Paste the code into the **Request body** field, replacing any existing sample code already there.
Click the **Send request** button.
Scroll down further to the **Response body** field, find the response’s `token` field, and copy it to a text file.
The interactive widgets appear only when you are signed in to the Marqeta platform.
{/* */}
Step 2 — Get a card product token
A card product defines the general characteristics and behavior of the cards that are generated from it. See the [Card Products](/core-api/card-products/) API reference page for more about the `/cardproducts` endpoint.
**Tip**
If you prefer, you can use the [cURL equivalent](/developer-guides/core-api-quick-start/#_create_a_card_product) from the [Sample cURLs](/developer-guides/core-api-quick-start/#_sample_curls) section instead of sending your request in the widget below.
Click the **GET /cardproducts** widget below.
In the widget, click the **Send request** tab.
Click the **Send request** button.
Scroll down further to the **Response body** field and find the response’s `token` field for the card product named "Reloadable Card". Copy the token to a text file so you have it available later on when creating a card.
{/* */}
Create a card
Cards inherit the characteristics of the card products from which they are generated and are owned by users. See the [Cards](/core-api/cards/) API reference page for more about the `/cards` endpoint.
The JSON-formatted code sample below is a request that creates a [single-use](/developer-guides/about-cards/#_single_vs_multi_use_cards) card that will become active immediately upon creation.
```json JSON lines wrap theme={null}
{
"user_token": "**USER TOKEN**",
"card_product_token": "**CARD PRODUCT TOKEN**"
}
```
**Tip**
If you prefer, you can use the [cURL equivalent](/developer-guides/core-api-quick-start/#_create_a_card_2) from the [Sample cURLs](/developer-guides/core-api-quick-start/#_sample_curls) section instead of sending your request in the widget below.
Copy the preceding code.
Click the **POST /cards** widget below.
In the widget, click the **Send request** tab.
Paste the code into the **Request body** field, replacing any existing sample code already there.
Replace the value of the `user_token` field with the token of the user you created previously.
Replace the value of the `card_product_token` field with the token of the card product you created previously.
Click the **Send request** button.
Scroll down further to the **Response body** field, find the response’s `token` field, and copy it to a text file. You will need this token later when you simulate transactions.
**Note**
If you make the above `POST` request to the `/cards` endpoint more than once, only the last card you create will be active. The state of any card you had previously created is automatically transitioned to `TERMINATED`.
For information about card states, see [The card lifecycle](/developer-guides/about-cards/#_the_card_lifecycle).
{/* */}
Step 3 — Transact
In this step, you simulate the authorization of a \$10 transaction. The sample request includes the required merchant ID number (MID). You will need the card token you created in the previous step. See [Simulate authorization](/core-api/simulations-card-transactions/#authorization_event) for more about the `/simulations/cardtransactions/authorization` endpoint.
**Note**
You don’t have to explicitly fund the card before transacting because the sandbox environment includes a [Just-in-Time Funding source](/developer-guides/about-jit-funding/). The card you created in the previous step is automatically associated with this JIT Funding source.
To simulate funding a card by pushing to your user’s general purpose account (GPA) instead, see the sample cURL for [Create a GPA order to fund a user account](#_create_a_gpa_order_to_fund_a_user_account).
```json JSON lines wrap theme={null}
{
"amount": "10",
"card_token": "**CARD TOKEN FROM PREVIOUS STEP**",
"card_acceptor": {
"mid": "123456890"
},
"network": "VISA"
}
```
Add the preceding code to the [simulate a transaction cURL](/developer-guides/core-api-quick-start/#_simulate_a_transaction) from the [Sample cURLs](/developer-guides/core-api-quick-start/#_sample_curls) section below.
Before executing the cURL, remember to replace the value of the `card_token` field with the token of the card you created earlier.
You can view the transaction you just simulated above using the interactive [Transaction Timeline](https://app.marqeta.com/development/transaction-timeline) tool. The Transaction Timeline provides a graphical, intuitive representation of how individual transactions impact each other, as well as how they affect the account balance. All public sandbox accounts with the Developer role include access to the Transaction Timeline.
For more information about viewing transaction activity in the [Transaction Timeline](https://app.marqeta.com/development/transaction-timeline), see the [Developer Tools](/developer-guides/developer-tools/) guide.
Next steps
This section shows how you can use webhooks to create and receive notifications, as well as how to add spend controls to a user or card product.
Add a webhook
In this step, you simulate another authorization transaction, this time with a webhook added to the request. The webhook instructs the Marqeta platform to push an event notification of the transaction to a specified URL.
This simulated transaction is initiated by an API call and will receive a response that is identical to the webhook notification.
* In a sandbox environment, you can use the Developer Tools UI in the Marqeta Dashboard to create and view your webhook. For more information about working with webhooks in the Marqeta Dashboard, see [Manage your webhooks](/developer-guides/control-center-dashboard/#_developer_tools).
* In a production environment, transactions are initiated by merchants from outside the Marqeta environment, and not by an API call. To receive notifications about events in production, you should set up webhooks. Learn about setting up webhooks in the [About Webhooks](/developer-guides/about-webhooks/).
In order to receive and inspect the event notification, provide a URL that can accept the notification. Beeceptor provides a free online service that lets you receive and inspect HTTP requests. To use this service, go to [https://beeceptor.com/](https://beeceptor.com/), create an endpoint for receiving requests, and copy its URL into the body of your transaction request, for example: `"endpoint": "https://marqeta-test.free.beeceptor.com/"`.
You must replace the value of the `card_token` field with the token of the card you created.
```json JSON lines wrap theme={null}
{
"amount": "10",
"card_token": "**CARD TOKEN**",
"card_acceptor": {
"mid": "123456890"
},
"network": "VISA",
"webhook": {
"endpoint": "**URL FOR RECEIVING NOTIFICATIONS**",
"username": "**MY USER NAME**",
"password": "**MY PASSWORD**"
}
}
```
Copy the preceding code.
Create the authorization using **POST /simulations/cardtransactions/authorization**.
Paste the code into the **Request body** field, replacing any existing sample code already there.
Replace the value of the `card_token` field with the token of the card you created previously.
Replace the value of the `webhook.endpoint` field with a valid URL for receiving HTTP requests.
Replace the values of the `username` and `password` fields with valid credentials for accessing the receiving endpoint.
If you are using [https://beeceptor.com](https://beeceptor.com) to receive the notification, you can leave these fields as they are (values are required for these fields, but can be any string).
Create spend controls
With the Marqeta platform, you can control a user’s spending based on:
* Where the user spends (individual merchants or merchant categories)
* How much the user spends (transaction amounts and frequency of spending)
* How much the user spends with a specified merchant or merchant category
Create an authorization control
The authorization control resource is a spend control on a card product or a user.
Authorization controls can either allow spending only at specified merchants, or block spending at specified merchants.
```json JSON lines wrap theme={null}
{
"name": "No Donuts",
"association": {
"card_product_token": "**CARD PRODUCT TOKEN FROM PREVIOUS STEP**"
},
"merchant_scope": {
"mid": "252824676910001"
},
"active": true
}
```
Copy the preceding code.
Click the **POST /authcontrols** widget below.
In the widget, click the **Send request** tab.
Paste the code into the **Request body** field, replacing any existing sample code already there.
Click the **Send request** button.
{/* */}
Create a velocity control
The velocity control resource is a spend control that limits how much and how frequently a user or a card product can spend funds.
```json JSON lines wrap theme={null}
{
"name": "100 Daily Spend Limit",
"association": {
"card_product_token": "**CARD PRODUCT TOKEN FROM PREVIOUS STEP**"
},
"usage_limit": 100,
"currency_code": "USD",
"amount_limit": 100,
"velocity_window": "DAY",
"active": true
}
```
Copy the preceding code.
Click the **POST /velocitycontrols** widget below.
In the widget, click the **Send request** tab.
Paste the code into the **Request body** field, replacing any existing sample code already there.
Click the **Send request** button.
{/* */}
API keys
You need valid API keys if you want to explore the API using your own client application or by executing cURLs. Keys consist of an application token, an admin access token, and the base URL of the sandbox environment. They are listed in your [Dashboard](https://app.marqeta.com/development):
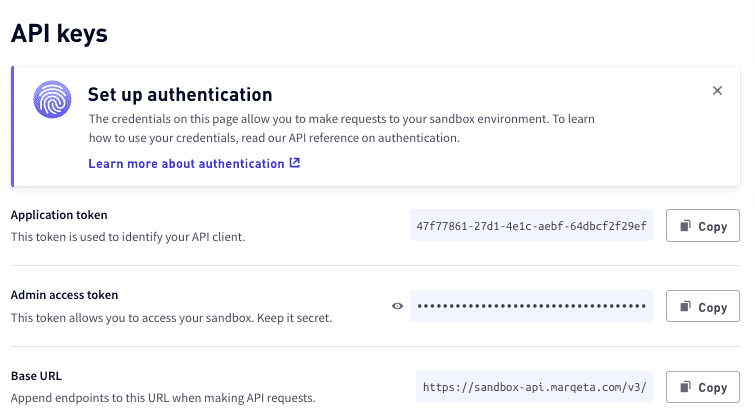 When making basic auth requests to the Marqeta platform, implement the API keys per the table below:
| Key Name | Usage |
| ------------------ | --------------------------------------- |
| Application token | Your username. |
| Admin access token | Your password. |
| Base URL | Prefix this value to your endpoint URL. |
See [Sample cURLs](#_sample_curls) for examples of all the requests used in this quick start. For more information about other tools available to help you develop your application, see [Developer Tools](/developer-guides/developer-tools/).
When making basic auth requests to the Marqeta platform, implement the API keys per the table below:
| Key Name | Usage |
| ------------------ | --------------------------------------- |
| Application token | Your username. |
| Admin access token | Your password. |
| Base URL | Prefix this value to your endpoint URL. |
See [Sample cURLs](#_sample_curls) for examples of all the requests used in this quick start. For more information about other tools available to help you develop your application, see [Developer Tools](/developer-guides/developer-tools/).
Sample cURLs
If you prefer to make the API calls in this quick start by executing cURLs, use the sample cURLs in this section.
Replace **username** and **password** in the samples with valid credentials. See [API Keys](#_api_keys) for more information.
Create a card product
Save the token returned in the response for later use.
```sh cURL lines wrap theme={null}
curl -i \
-X POST \
-H 'Content-type: application/json' \
--user *username*:*password* \
-d '{
"start_date": "2023-01-01",
"name": "Example Card Product",
"config": {
"fulfillment": {
"payment_instrument": "VIRTUAL_PAN"
},
"poi": {
"ecommerce": true
},
"card_life_cycle": {
"activate_upon_issue": true
}
}
}' \
"https://sandbox-api.marqeta.com/v3/cardproducts"
```
Create a program funding source
Save the token returned in the response for later use.
```sh cURL lines wrap theme={null}
curl -i \
-X POST \
-H 'Content-type: application/json' \
--user *username*:*password* \
-d '{
"name": "Program Funding"
}' \
"https://sandbox-api.marqeta.com/v3/fundingsources/program"
```
Create a user
Save the token returned in the response for later use.
```sh cURL lines wrap theme={null}
curl -i \
-X POST \
-H 'Content-type: application/json' \
--user *username*:*password* \
-d '{ }' \
"https://sandbox-api.marqeta.com/v3/users"
```
Create a card
Save the token returned in the response for later use.
```sh cURL lines wrap theme={null}
curl -i \
-X POST \
-H 'Content-type: application/json' \
--user *username*:*password* \
-d '{
"user_token": "**USER TOKEN FROM PREVIOUS STEP**",
"card_product_token": "**CARD PRODUCT TOKEN FROM PREVIOUS STEP**"
}' \
"https://sandbox-api.marqeta.com/v3/cards?show_cvv_number=true&show_pan=true"
```
Simulate a transaction
**Note**
Omit the `webhook` object if you do not want to receive an event notification.
Save the token returned in the response for later use.
```sh cURL lines wrap theme={null}
curl -i \
-X POST \
-H 'Content-type: application/json' \
--user *username*:*password* \
-d '{
"amount": "10",
"card_token": "**CARD TOKEN FROM PREVIOUS STEP**",
"card_acceptor": {
"mid": "123456890"
},
"network": "VISA",
"webhook": {
"endpoint": "**URL FOR RECEIVING NOTIFICATIONS**",
"username": "**MY USER NAME**",
"password": "**MY PASSWORD**"
}
}' \
"https://sandbox-api.marqeta.com/v3/simulations/cardtransactions/authorization"
```
Create an authorization control
```sh cURL lines wrap theme={null}
curl -X POST \
-H 'Content-Type: application/json' \
-u *username*:*password* \
-d '{
"name": "No Donuts",
"association": {
"card_product_token": "**CARD PRODUCT TOKEN FROM PREVIOUS STEP**"
},
"merchant_scope": {
"mid": "252824676910001"
},
"active": true
}'
"https://sandbox-api.marqeta.com/v3/authcontrols"
```
Create a velocity control
```sh cURL lines wrap theme={null}
curl -X POST \
-H 'Content-type: application/json' \
-u *username*:*password* \
-d '{
"name": "100 Daily Spend Limit",
"association": {
"card_product_token": "**CARD PRODUCT TOKEN FROM PREVIOUS STEP**"
},
"usage_limit": 100,
"currency_code": "USD",
"amount_limit": 100,
"velocity_window": "DAY",
"active": true
}'
"https://sandbox-api.marqeta.com/v3/velocitycontrols"
```
Create a GPA order to fund a user account
Use this cURL to load \$1000 into the general purpose account (GPA) of your user by creating a `gpaorder` object.
The `funding_source_token` identifies the funding source to use for this transaction; this is how you can access funds outside of the Marqeta platform. You must configure at least one funding source in order to transact in a production environment. Your program funding source token is available in your [Dashboard](https://app.marqeta.com/development).
The sample below is a request that creates a \$1000 `gpaorder`.
```sh cURL lines wrap theme={null}
curl -i \
-X POST \
-H 'Content-type: application/json' \
--user *username*:*password* \
-d '{
"user_token": "**USER TOKEN FROM TUTORIAL ABOVE**",
"amount": "1000.00",
"currency_code": "USD",
"funding_source_token": "sandbox_program_funding"
}' \
"https://sandbox-api.marqeta.com/v3/gpaorders"
```