

Note
After launching your card program in production, Marqeta will handle some of the operations described in this tutorial. Consult your Marqeta representative before trying these steps in production.
After launching your card program in production, Marqeta will handle some of the operations described in this tutorial. Consult your Marqeta representative before trying these steps in production.
Note
Any user can sign up for a public sandbox.A private sandbox is provisioned for you once you become a customer. Your credentials will be sent to you, and your sandbox is managed via the Marqeta Dashboard. A private sandbox has simulation capabilities that the public sandbox does not.
Any user can sign up for a public sandbox.A private sandbox is provisioned for you once you become a customer. Your credentials will be sent to you, and your sandbox is managed via the Marqeta Dashboard. A private sandbox has simulation capabilities that the public sandbox does not.
- Create the objects you use in sandbox transactions: a card product, a user, and a card.
- Simulate a transaction.
- Set up and receive a webhook notification about a simulated transaction.
- Access your API credentials.
Step 1 — Connecting to sandbox
Create an account
Select the Public Sandbox button to create an account on the Marqeta platform: As part of creating your account on Marqeta.com, you will also create a sandbox and a user.Create a sandbox
After you have created your account and signed in again, you are ready to create the public sandbox where you can simulate transactions on the Marqeta platform. Select Create sandbox. You will receive an email when your sandbox is ready. The sandbox creation page refreshes to display your Dashboard. Your personal API keys and a cURL to try out the sandbox are provided here.Connect to your sandbox
In order to run through the API’s in this quick start you will need to connect to your sandbox via an API client, or you can use your terminal and run them as curl commands. To do so you will require the sandbox API keys. Keys consist of an application token, an admin access token, and the base URL of the sandbox environment. They are listed in your Dashboard: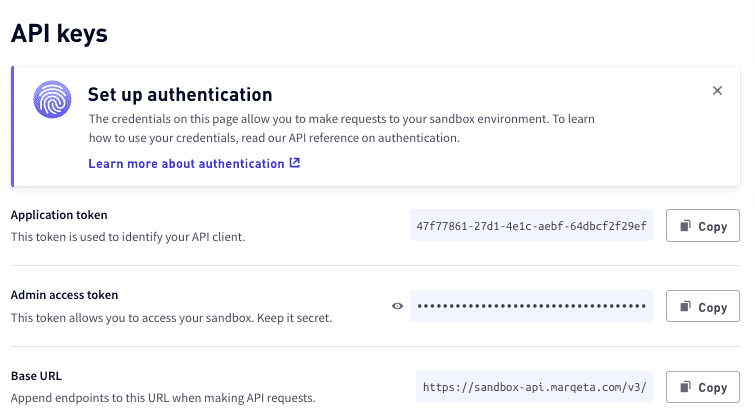
When using cURL, replace the username and password in the samples with valid credentials.
For more information about other tools available to help you develop your application, see Developer Tools.
Step 2 - Create a user
The JSON-formatted code sample below creates a simple user by omitting most request fields. See the Users API reference page for more about the/users endpoint.
- In your API client, set up your POST /users request with the following JSON in the body.
JSON
- Send the request. Save the token number returned in the
tokenfield of the response body - you will need this to create a card.
cURL
username and password with your credentials before running. Save the token returned in the response - you will need this to create a card.
Step 3 — Set up your card
Get card products
A card product defines the general characteristics and behavior of the cards that are generated from it. See the Card Products API reference page for more about the/cardproducts endpoint.
- In your API client, send the GET /cardproducts request.
- In the response body, find the
tokenfield for the card product named “Reloadable Card” - save this token you will need it when creating a card. - Send the request.
cURL
username and password with your credentials. Save the token returned in the response for the card product named “Reloadable Card” - you will need this to create a card.
Create a card
Cards inherit the characteristics of the card products from which they are generated and are owned by users. See the Cards API reference page for more about the/cards endpoint.
- In your API client, set up your POST /cards request with the following JSON in the body.
JSON
- Replace the
USER TOKENandCARD PRODUCT TOKENfields with the tokens you recorded when you created your user and when you called for your card product information.Note
This JSON-formatted code sample is a request that creates a single-use card that will become active immediately upon creation. - Send the request. Save the token returned in the
tokenfield of the response body - you will need this to simulate transactions. - Send the request.
Note
If you make the above
If you make the above
POST request to the /cards endpoint more than once, only the last card you create will be active. The state of any card you had previously created is automatically transitioned to TERMINATED. For information about card states, see The card lifecycle.cURL
username and password with your credentials, and USER TOKEN and CARD PRODUCT TOKEN with the tokens saved from the previous steps. Save the token returned in the response - you will need this to simulate transactions.
Step 4 — Transact
In this step, you simulate the authorization of a $10 transaction. The sample request includes the required merchant ID number (MID). You will need the card token you created in the previous step. See Simulate authorization for more about the/simulations/cardtransactions/authorization endpoint.
Note
You don’t have to explicitly fund the card before transacting because the sandbox environment includes a Just-in-Time Funding source. The card you created in the previous step is automatically associated with this JIT Funding source.To simulate funding a card by pushing to your user’s general purpose account (GPA) instead, see the sample cURL for Create a GPA order to fund a user account.
You don’t have to explicitly fund the card before transacting because the sandbox environment includes a Just-in-Time Funding source. The card you created in the previous step is automatically associated with this JIT Funding source.To simulate funding a card by pushing to your user’s general purpose account (GPA) instead, see the sample cURL for Create a GPA order to fund a user account.
- In your API client, set up your POST /simulations/cardtransactions/authorization request with the following JSON in the body.
JSON
- Replace
CARD TOKENwith the token you recorded in the step when creating your card. - Send the request.
cURL
username and password with your credentials, and CARD TOKEN with the card token you saved from the previous steps.
Create a GPA order to fund a user account
To simulate funding a card by pushing to your user’s general purpose account (GPA) instead of the built-in JIT funding source set up in the public sandbox, you will need to first create a GPA order. This exercise will have you loading $1000 into the general purpose account (GPA) of your user by. See the GPA order API reference page for more about the/gpaorder endpoint.
The funding_source_token identifies the funding source to use for this transaction; this is how you can access funds outside of the Marqeta platform. For this example our funding source token will be the sandbox configured program funding.
Note
When setting a GPA order up in production, you must first configure at least one funding source. Your program funding source token will then be available in your Dashboard.
When setting a GPA order up in production, you must first configure at least one funding source. Your program funding source token will then be available in your Dashboard.
- In your API client, set up your POST /gpaorder request with the following JSON in the body.
JSON
- Replace
USER TOKENwith the token you recorded in the step when creating your user. - Send the request.
cURL
USER TOKEN with the token you recorded when adding a user in previous steps.
Transaction timeline tool
You can view the transaction you just simulated above using the interactive Transaction Timeline tool. The Transaction Timeline provides a graphical, intuitive representation of how individual transactions impact each other, as well as how they affect the account balance. All public sandbox accounts with the Developer role include access to the Transaction Timeline. For more information about viewing transaction activity in the Transaction Timeline, see the Developer Tools guide.Step 5 - Manage your card products
This section talks about tracking transactions with notifications, and managing spend controls for your users or card products.Add a webhook
In this step, you simulate another authorization transaction, this time with a webhook added to the request. The webhook instructs the Marqeta platform to push an event notification of the transaction to a specified URL. This simulated transaction is initiated by an API call and will receive a response that is identical to the webhook notification.- In a public sandbox environment, you can manage webhooks by accessing the Sandbox dashboard by selecting the Public Sandbox button on this documentation site. You can create your webhooks in the Marqeta Dashboard to create and view your webhook. For more information about working with webhooks in the public sandbox, see Manage your webhooks.
- In a production environment, transactions are initiated by merchants from outside the Marqeta environment, and not by an API call. To receive notifications about events in production, you should set up webhooks. Learn about setting up webhooks in the About Webhooks.
"endpoint": "https://marqeta-test.free.beeceptor.com/".
- In your API client, set up your POST /simulations/cardtransactions/authorization request with the following JSON in the body.
JSON
- Replace
CARD TOKENwith the token you recorded in the step when creating your card. - Replace the
URL FOR NOTIFICATIONwith a valid URL for receiving HTTP requests. - Replace the values of the USER NAME and PASSWORD with valid credentials. (If you are using https://beeceptor.com to receive the notification, you can leave these fields as they are).
- Send the request.
cURL
CARD TOKEN with the token you recorded in the step when creating your card, URL FOR NOTIFICATIONS with a valid URL for receiving HTTP requests, and the USER NAME and PASSWORD values with valid credentials for accessing the receiving endpoint. (If you are using https://beeceptor.com to receive the notification, you can leave these fields as they are).
Create spend controls
With the Marqeta platform, you can control a user’s spending based on:- Where the user spends (individual merchants or merchant categories)
- How much the user spends (transaction amounts and frequency of spending)
- How much the user spends with a specified merchant or merchant category
Create an authorization control
The authorization control resource is a spend control on a card product or a user. Authorization controls can either allow spending only at specified merchants, or block spending at specified merchants. See the Authorization Controls API reference page for more about the/authcontrols endpoint.
- In your API client, set up your POST /authcontrols request with the following JSON in the body.
JSON
- Replace
CARD PRODUCT TOKENwith the token you recorded in the step when calling for information about your card products. - Send the request.
cURL
CARD PRODUCT TOKEN with the token you recorded in the step when calling for information about your card products.
Create a velocity control
The velocity control resource is a spend control that limits how much and how frequently a user or a card product can spend funds.- In your API client, set up your POST /velocitycontrols request with the following JSON in the body.
JSON
- Replace
CARD PRODUCT TOKENwith the token you recorded in the step when calling for information about your card products. - Send the request.
cURL
CARD PRODUCT TOKEN with the token you recorded in the step when calling for information about your card products.